Introduction
Just got a new Chromebook? Congratulations! Setting it up the right way will not only improve its speed and security but also make it more user-friendly. If you’re new to ChromeOS, don’t worry—this guide will walk you through the essential steps to get the best experience. Let’s dive in!

1. Link Your Phone for Easy Syncing
ChromeOS allows you to connect your Android phone seamlessly. This feature lets you:
- Unlock your Chromebook with your phone.
- Connect to your phone’s hotspot when Wi-Fi is unavailable.
- Receive messages and notifications directly on your Chromebook.
- Access your phone’s apps, photos, and recent tabs.
How to Link Your Phone:
- Open the Launcher and go to Settings.
- Click “Connected Devices” and select “Set Up” next to Android Phone.
- Choose your phone from the list and click “Connect.”
- Enter your password and select “Done.”
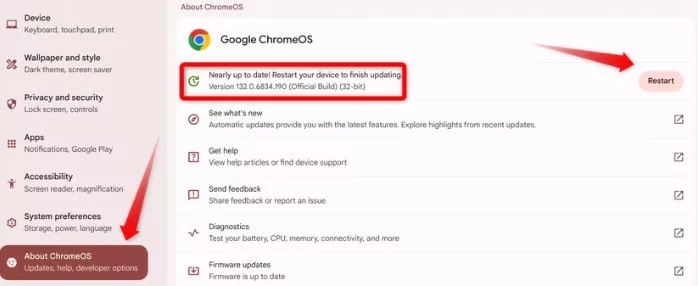
2. Update Your Chromebook for New Features
Your Chromebook might have been sitting in a store for months, meaning it could be outdated. Updating it ensures you have the latest features and security patches.
How to Update:
- Open Settings and select “About Chrome OS.”
- Click “Check for Updates.”
- If an update is available, your Chromebook will download and install it automatically.
- Restart your device to complete the process.
3. Download Apps from the Play Store
While your Chromebook comes with built-in apps like YouTube, Google Maps, and Google Workspace, you might need more. The Google Play Store lets you download apps just like on an Android phone.
How to Download Apps:
- Open the Play Store from the Launcher.
- Search for the app you need and click “Install.”
- Once installed, the app will appear in your Launcher.
Note: Some Android apps may not work perfectly on Chromebooks, so test them out!
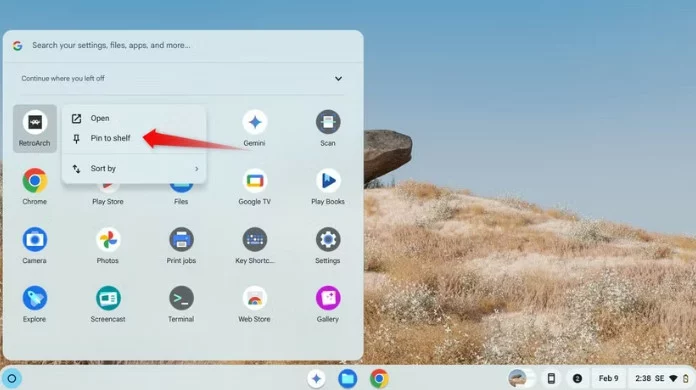
4. Customize Your Shelf for Quick Access
The Shelf is the taskbar at the bottom of your screen. You can pin your favorite apps for quick access and even change its position.
How to Customize the Shelf:
- Pin an App: Open the Launcher, right-click the app, and select “Pin to Shelf.”
- Remove an App: Right-click the app on the Shelf and choose “Unpin.”
- Autohide the Shelf: Right-click the Shelf and select “Autohide Shelf” for a cleaner look.
- Change Shelf Position: Right-click the desktop, select “Shelf Position,” and choose a new location.
5. Change Lock Screen Settings for Better Security
By default, you’ll need to enter your Google password to sign in. However, you can set up a PIN for quicker access or use a different password if you share your Chromebook.
How to Change Lock Screen Settings:
- Go to Settings > Privacy and Security > Lock Screen.
- Click “Set Up” next to the password or PIN option.
- Follow the on-screen instructions to complete the setup.
6. Personalize Your Chromebook
Make your Chromebook truly yours by customizing its appearance and functionality.
Ways to Personalize:
- Change Wallpaper and Theme: Go to Settings > Personalization.
- Organize Apps: Create folders in the Launcher for better organization.
- Remap Keys: Go to Settings > Device > Keyboard to change key functions.
- Switch Between Light and Dark Mode: Adjust the theme in Settings > Personalization.
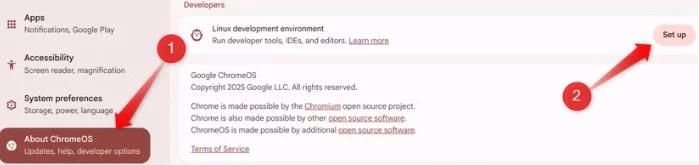
7. Set Up Linux for More Features
If your Chromebook supports Linux, you can enable it to access advanced software, coding tools, and even games.
How to Set Up Linux:
- Go to Settings > About ChromeOS.
- If you see “Linux Development Environment,” your Chromebook is compatible.
- Click “Set Up,” allocate storage, and click “Install.”
- Once installed, open the Terminal and run these commands to update Linux:
sudo apt update
sudo apt upgrade
8. Customize Google Chrome
Chrome is the default browser on your Chromebook. Personalizing it can enhance your browsing experience.
How to Customize Chrome:
- Change Startup Page: Go to Settings > On Startup.
- Apply a Theme: Visit the Chrome Web Store to download themes.
- Switch Search Engine: Go to Settings > Search Engine.
- Add Extensions: Install productivity tools from the Chrome Web Store.
9. Adjust Keyboard and Touchpad Settings
Make your Chromebook more comfortable to use by customizing the keyboard and touchpad.
How to Adjust Settings:
- Keyboard: Go to Settings > Device > Keyboard to remap keys.
- Touchpad: Enable tap-to-click or reverse scrolling in Settings > Device > Touchpad.
10. Configure Security and Privacy Settings
Keep your Chromebook secure by reviewing its privacy settings.
Key Settings to Adjust:
- Location Tracking: Go to Settings > Privacy and Security.
- Safe Browsing: Enable this in Chrome to block malicious websites.
- Verified Access: Ensure websites verify your device’s security.
11. Manage Notifications to Reduce Distractions
Too many notifications can be overwhelming. Manage them to stay focused.
How to Manage Notifications:
- Go to Settings > Notifications.
- Disable or customize app notifications.
- Enable “Do Not Disturb” for uninterrupted focus time.
12. Set Up Network Preferences
Ensure a stable internet connection by configuring your Wi-Fi settings.
How to Set Up:
- Go to Settings > Network > Wi-Fi.
- Select your network and enter the password if needed.
- For extra security, set up a VPN in Settings > Network > VPN.
13. Enable Guest Mode for Shared Use
If others need to use your Chromebook, enable Guest Mode to protect your files and apps.
How to Enable Guest Mode:
- Sign out of your account.
- Click “Browse as Guest” on the login screen.
14. Set Automatic Backups for Important Data
Avoid losing important files by setting up automatic backups.
How to Back Up Data:
- Use Google Drive to store files. Open the Files app, select Google Drive, and move your files there.
- For offline storage, use an external hard drive or USB stick.
Final Thoughts
Setting up your Chromebook properly ensures a smooth and enjoyable experience. By following these steps, you’ll improve its performance, security, and usability. Don’t forget to explore advanced features like Linux, security settings, and cloud backups to get the most out of your device.