Introduction
Do you own an old Android device that no longer receives updates? Are you tired of bloatware draining your battery or Google tracking your every move? Flashing a custom ROM can breathe new life into your device while boosting privacy and performance. In this guide, we’ll walk through the entire process using a Sony Xperia S (2012 model) as a case study. By the end, you’ll understand how to safely install a custom ROM, troubleshoot common issues, and reclaim control over your Android experience.
Why Flash a Custom ROM?
Before diving into the technical steps, let’s explore why this process matters:
- Environmental Impact: Smartphone production harms the planet. Extending your device’s lifespan reduces e-waste.
- Bloatware Removal: Manufacturers and carriers pre-install apps you can’t uninstall. Custom ROMs strip these away.
- Privacy: Minimize Google’s data collection by using open-source Android versions.
- Security Updates: Old devices stuck on outdated OS versions become vulnerable. Custom ROMs often receive regular updates.
Risks to Consider
While rewarding, flashing a ROM isn’t risk-free:
- Warranty Void: Unlocking the bootloader may void warranties.
- Data Loss: The process wipes your device. Always back up first!
- Bricking: A wrong step could render your device unusable.
- Security Concerns: Downloading ROMs from unofficial sources carries risks.
Key Concepts Explained
What Is a ROM?
A ROM (Read-Only Memory) refers to the operating system stored on your device. Custom ROMs are modified versions of Android, often debloated or optimized for performance.
Bootloader Explained
The bootloader is low-level software that starts your OS. Unlocking it lets you install custom software.
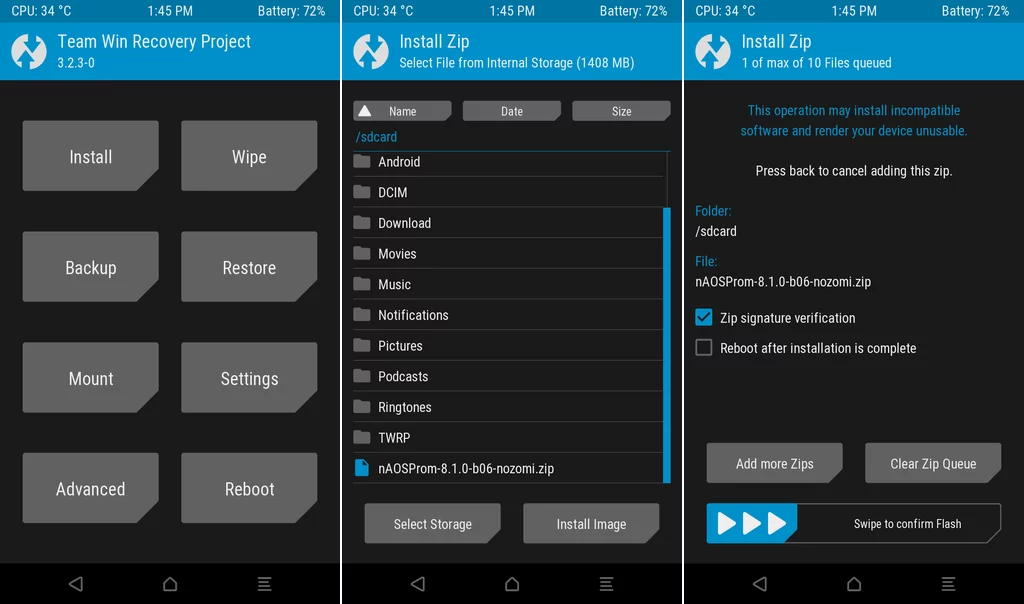
TWRP Recovery
Team Win Recovery Project (TWRP) is a tool for installing ROMs, backing up data, and troubleshooting.
Step-by-Step Guide to Flashing a Custom ROM
1. Find a Compatible ROM
- Visit XDA-Developers Forum and search for your device (e.g., “Xperia S”).
- For our example, we used nAOSP 8.1 Oreo, a lightweight ROM.
⚠️ Warning: Never use ROMs meant for other devices!
2. Install Android SDK Platform-Tools
- Download Platform-Tools for your OS (Windows/Linux/macOS).
- Extract the files and add the
adbandfastboottools to your system’s PATH.
3. Unlock the Bootloader
Check Unlock Status:
Dial
*#*#7378423#*#*> Service Info > Configuration > Rooting Status. If it says “Yes,” proceed.
Enable USB Debugging:
Go to Settings > About Phone > Build Number (tap 7 times). Then, enable Developer Options > USB Debugging.
Connect to Fastboot:
Run
adb reboot bootloaderto enter fastboot mode.
Get Unlock Code:
Retrieve your IMEI via
*#06#, then request an unlock code from Sony’s official site.
Unlock:
Run
fastboot oem unlock 0x<unlock_code>.
💡 Note: This wipes all data!
4. Install TWRP Recovery
- Download the correct TWRP image for your device.
- For Xperia S, flash it to the boot partition (not recovery):
bash
fastboot flash boot twrp-3.2.3-nozomi.img
Reboot into recovery using
Volume Upduring startup.
5. Flash the Custom ROM
- Transfer the ROM ZIP file to your device:
bash
adb push nAOSProm-8.1.0-b06-nozomi.zip /sdcard
- In TWRP, select Install > Choose ZIP > Swipe to Confirm.
- Reboot. The first boot may take 10–15 minutes.
Troubleshooting Common Issues
Problem: “Partition Not Found” Error
Solution: Some devices (like Xperia S) lack a dedicated recovery partition. Flash TWRP to the boot partition instead.
Problem: Google Play Services Crashing
Solution: Use Open GApps Pico (minimal package). Flash it immediately after the ROM without rebooting.
Problem: Stuck in Bootloop
Solution: Reboot into TWRP, perform a factory reset, and reinstall the ROM.
Post-Installation Tips
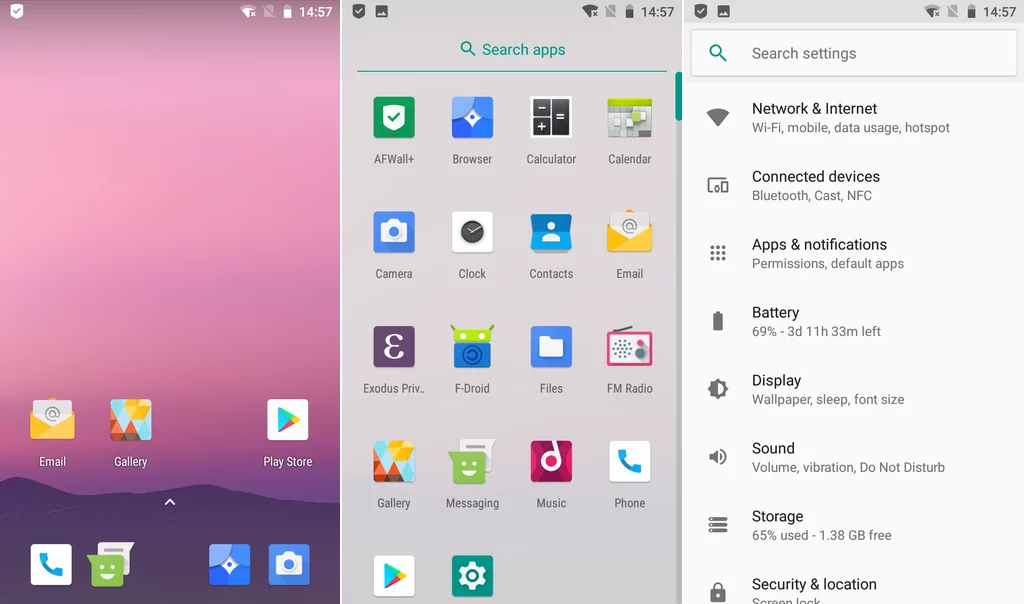
Install F-Droid for Open-Source Apps
- Download F-Droid from f-droid.org.
- Explore privacy-focused apps like Signal, NewPipe, and Aurora Store.
Avoid Google Tracking
- Use MicroG instead of Google Play Services.
- Opt for alternatives like ProtonMail and OSMAND Maps.
Conclusion
Flashing a custom ROM transforms an outdated device into a secure, bloat-free tool. While challenges like TWRP installation hurdles exist, patience and research pay off. For the Xperia S, nAOSP 8.1 Oreo delivered a modern Android experience on a 12-year-old device.
Final Checklist:
- Backup data.
- Verify ROM compatibility.
- Follow instructions meticulously.