Introduction
A number of new features and enhancements are anticipated in the Windows 11 24H2 upgrade, which is anticipated to be released in September or October 2024. In order to test and improve the operating system before to the final release, Microsoft is providing an early preview of this upgrade. I’ll go over how to get this early version in this guide.
There are a few ways to test out Windows 11 24H2 before its official release, even though upgrading to a pre-release version might be dangerous because of possible bugs and stability concerns. Using the “Windows Update” settings, you can get updates before the general public by signing up for the Release Preview Channel of the Windows Insider Program. For a clean installation or an in-place upgrade, you may also download the Windows 11 24H2 ISO. Additionally, you may flash it on PCs that don’t satisfy the criteria thanks to the latter.
On June 18, 2024, Microsoft started distributing version 24H2 to Copilot+ PCs with ARM-based CPUs. Although there could be a chance to install it earlier in September 2024, the final version for other devices is expected to be released around October 2024.
All The Goodies Are Included In The Windows 11 2024 Update
Among the many new features included in the Windows 11 2024 Update are AI-powered advancements made possible by the Windows Copilot Runtime. These features include Auto Super Resolution (Auto SR), Windows Studio Effects, Voice Clarity, Windows Recall (delayed), and Live Captions. Updates to Bluetooth and sound settings, Windows Protected Print Mode, support for the Linux Sudo command, a new Energy Saver mode for laptops and desktops, and the addition of “Color Management” settings to the Settings app are examples of non-AI improvements.
Since the system requirements haven’t changed, you may upgrade straight to Windows 11 24H2 if your PC is already running Windows 11. You may upgrade if you’re still on Windows 10, but you’ll need to make sure your system satisfies the minimal requirements. In particular, you need have a CPU from the Qualcomm 7 and 8 Series, AMD Zen 2 or later, or Intel 8th Gen or later, as well as TPM 2.0 and at least 64GB of storage.
I’ll lead you through the process of upgrading to Windows 11 24H2 in this article. If you experience problems with the new version’s compatibility or performance, I’ll also explain how to remove Windows 11 24H2 and go back to your old configuration. Without further ado, let’s begin the necessary procedures for installing Windows 11 24H2 from scratch.
How to Install Windows 11 24H2 Update Via Insider Preview Program
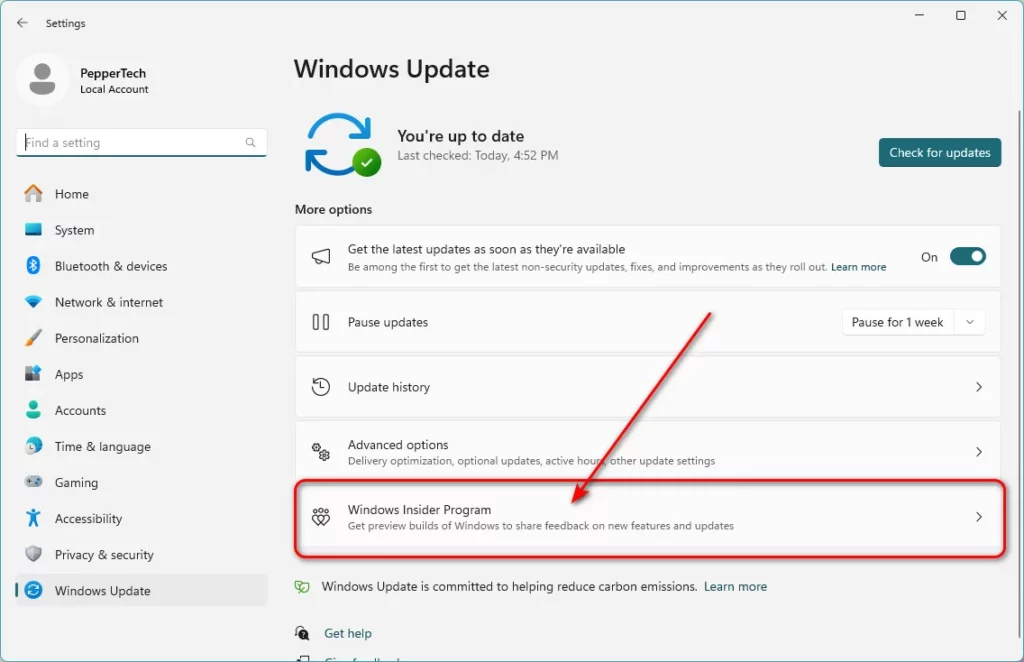
- On your Windows 11 machine, open Settings.
- In the sidebar, select Windows Update.
- Choose the page for the Windows Insider Program.
- Press the button labeled “Get Started.”
- The “Link an account” button should be clicked.
- If asked, log in using your Microsoft account.
- Press “Continue.”
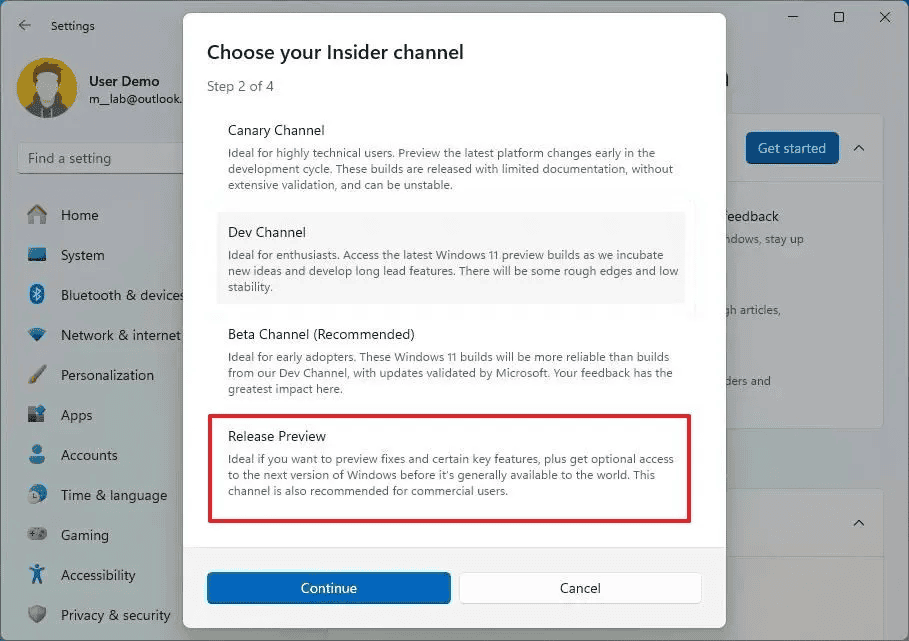
- Choose the Release Preview Channel option from the “Pick your Insider settings” section.
- Press “Continue.”
- To accept the terms and conditions, click the Continue button.
- Press the “Restart” button.
- After rebooting, open Settings.
- Select Windows Update.
- Click the option that says “Check for updates.”
- To get the most recent preview of Windows 11 24H2, click the “Download & install” option.
- Press the “Restart” button.
Windows Update will download and install the 24H2 update on your computer after you’ve finished the instructions.
You can choose not to participate in the Insider Program when the update is finished by selecting the Stop receiving Preview Builds switch on the Windows Insider Program settings page. Your involvement in the preview builds will come to an end at this point, but you will still get updates for version 24H2 until it is officially released. Your machine will be immediately withdrawn from the Insider Program upon the official release of the final version. For Windows 10 users, enroll your device in the Release Preview Channel by selecting Settings > Update & Security > Windows Insider Program and clicking the Get Started button. You will be prepared to receive the update through the Windows Update after completing these steps. Other choices are Canary Channel, Beta, and Dev. These aren’t intended for frequent users, though, and can be quite unreliable.
How to Install Windows 11 24H2 via ISO File
Use these instructions to obtain the Windows 11 24H2 update ISO file from the Windows Insider Preview Downloads page:
- Go to the Downloads page for Windows Insider Preview.
- Note: After the ISO file is formally published, Microsoft will post the final version on the official download website. The ISO is currently available for download via the UUP Dump tool or the
- Insider download website.
- Enter your Microsoft account information to log in.
- Select the “Windows 11 Insider Preview (Release Preview Channel) – Build 26100.xxxx” option in the Select edition setting.
- Press the “Confirm” button.
- Choose the language of the product.
- Press the “Confirm” button.
- Press the “Download 64-bit” button.
To flash the ISO file using a USB stick after downloading it, you will require a third-party software program. You can mount the ISO and attempt to install it by clicking on the installer if you’re attempting to install it on your present computer. Rufus may be used to create a bootable USB stick and to get rid of the TPM 2.0 and Secure Boot requirements if you wish to test it on a different computer that doesn’t support Windows 11.
Download and Start Rufus
Next, use Rufus to prepare a bootable USB drive by following these steps:
- Go to the Rufus website and find the Download section by scrolling down.
- To obtain the most recent version of Rufus that is compatible with your Windows version, click the link.
- Rufus may be used without installation by just running the downloaded EXE file.
- Connect a USB device to your computer. Remember that Rufus will use the Windows 11 installation files to completely reformat this USB drive, so make sure you have a backup of any vital data.

How to Make USB Stick to Bypass Windows 11 Requirements
Create a bootable USB device by following these instructions in the Rufus window:
- Select the Windows 11 ISO file you downloaded by clicking the Select button at the top.
- Make sure that Standard Windows installation appears in the field under the Image selection.
- Make sure the USB drive you plan to use is selected in the Device area at the top of the page. If not, manually choose the appropriate drive by clicking the drop-down option.
- The other settings can be left alone.
- Click the Start button at the bottom of the window when you’re prepared.
- Rufus will create a bootable drive that is prepared for installation by formatting the USB drive and copying the Windows 11 installation files to it.
How to Bypassing Hardware Requirements Using Rufus:
- Launch Rufus and set it up as previously mentioned to make a USB device that can be booted using the Windows 11 ISO.
- A pop-up window will show up when Rufus is prepared.
- Select the “Remove requirement for 4GB+ RAM, Secure Boot, and TPM 2.0” box in this window. If your computer doesn’t fulfill the minimum hardware requirements, you may use this method to go around them and still install Windows 11.
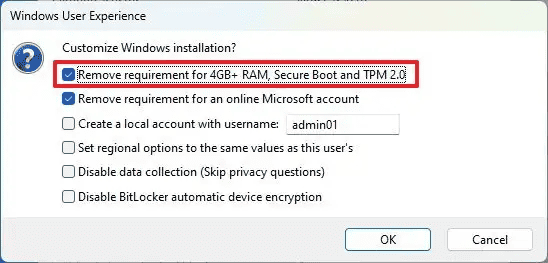
Note: Due to the possibility of stability and security problems, Microsoft does not recommend operating Windows 11 on incompatible hardware. This is an unapproved solution that has to be utilized carefully.
- To verify that the hardware requirements have been removed, click OK.
- To begin configuring your USB drive, click OK once again.
- Await Rufus to copy the Windows 11 installation files to the disk and format it.
After the procedure is finished, make sure the USB drive is attached to the machine you want to update or the one where you want to install Windows 11 from scratch. Next, restart the computer and choose to boot directly from the pen drive. You will then be able to install Windows 11 using the traditional way.