Introduction
It might be difficult to switch between services that store a lot of your data, such as file/photo syncing services or email providers. Thankfully, many services now include data export options as a result of the EU’s GDPR. This implies that you may now quickly download your data from Google Drive, Google Photos, and Facebook Messenger. I think it’s a good addition to Google Photos. After all, when Google Photos ceased offering limitless storage for photo backups, storage management became quite difficult. It quickly left many Gmail users without storage, and managing that capacity without deleting certain Google Photos files is difficult. You may utilize the old-fashioned backups on external disks or move your information to another server with this option.
You may export your data from Google Photos using Google Takeout (takeout.google.com). You may then select the data you wish to export; these will be in the form of.zip files. We’ve already discussed how to get all of your photographs from Google Drive, but because Google maintains photo information distinct, the procedure can be a little challenging. Don’t worry, though; we’ll walk you through using Google Takeout to export your photo data while ensuring that all of the information is preserved (via).
How Google Photos Data Can Be Exported
It is simple to export your images from Google Photos. Simply take these actions:
- Visit Google Takeout: Go to takeaway.google.com and sign in using your Google credentials.
- Choose Your Information: After logging in, a list of Google services will appear. Select Deselect all to begin over.
- Select Google Photos: To tick the option next to Google Photos, scroll down. You may choose All photo albums included to pick particular albums or years if necessary, but by default, this will include all of your photo albums.
- Set Up Your Export: Click Next Step after scrolling to the bottom. You must decide how you would want your files to be sent to you. By default, you will receive an email with a link to download and store your data in.zip files. For these.zip files, you may also specify the file size; unless you’re exporting a lot of data, it’s generally a good idea to limit it at 2GB.
- Make an export: On Create export, click. After processing your request, Google will send you an email with a download link.
- Get and arrange: Save your.zip files in a different folder for the time being after downloading them. You should save the original.zip files in case you need to redo anything, so don’t combine or remove them just yet.
That’s it! Your data export from Google Photos has been completed. We’ll now discuss how to obtain your metadata and merge it with your files.
How to Merge Your Metadata and Exported Images
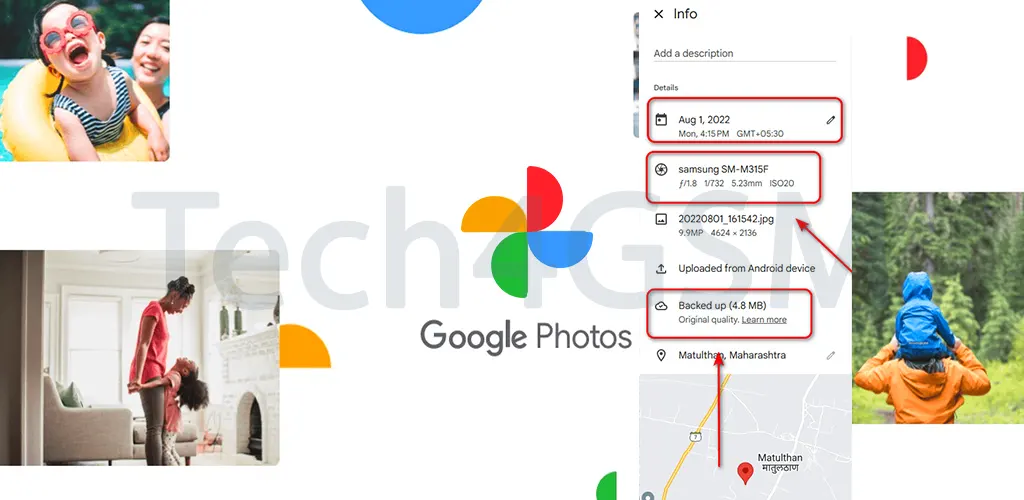
You may discover that, although your photographs are present after exporting them using Google Takeout, the information is absent. Google separates the metadata from the photos in the export, however each photo has a corresponding.json file. Take these actions to resolve this and combine your information with the images:
- Obtain Google Photos Takeout Helper, or GPTH: This program, which is accessible on GitHub, merges images and information. It is compatible with Windows, Linux, and macOS.
- Get GPTH here: Download the binaries for your operating system (e.g.,
gpth-macosfor macOS). from the GPTH Releases page. - Get Your Files Ready: The extracted Google Takeout folder should be in the same directory as the downloaded GPTH program.
Configure Permissions (Linux/macOS):
- Go to the directory in a terminal window.
- Run
sudo chmod +x gpth-macos(orgpth-Linuxfor Linux).
For users of macOS:
Use the following to enable Rosetta emulation and get around Gatekeeper:
bash
softwareupdate --install-rosetta

xattr -r -d com.apple.quarantine gpth-macos
Launch GPTH:
- Double-clicking the.exe file will launch it on Windows.
Run it from the terminal on macOS/Linux:
bash
./gpth-macosor
bash
./gpth-linux- Choose the Takeout folder, which contains your exported data.
- Select a target folder to hold the merged files.
- Choose whether to arrange the output by year/month or into a single folder.
- The default setting is typically the most effective for managing albums. Try the duplicate-copy option if you run into problems; it will take up more disk space but will be more reliable.
Examine your files:
- Go to the desired folder when the operation is finished. Your photographs and information need to be merged and prepared for importation into another photo management program.
Final Words
Now that Google Photos is no longer offering limitless storage, it is more important than ever to manage your photo collection. Every new picture and video you post will now be deducted from your storage allowance as boundless storage has been removed. To prevent running out of storage, you might need to buy more storage or be more cautious about how many files you upload.
Effective management of your photographs and metadata is essential to ensure a seamless transfer without losing crucial information or having insufficient backups if you’re thinking of moving your images to a different provider or a self-hosted solution. It is easier to manage data migration and re-upload if needed when file sizes and script runs are kept between 2GB and 5GB to avoid crashes and memory problems during the export process.
Having a solid backup plan is crucial now that Google no longer provides unlimited storage. This may entail utilizing many services or making sure local backups are current and accessible. With the use of effective solutions like GPTH (Google photographs Takeout Helper), merging photographs and metadata may be made easier while maintaining all pertinent information and making the switch to a new provider easier. Therefore, this article will be very helpful to you as you manage Google’s storage.